Reflecting upon developing and publishing my first application on the App Store
Originally posted on reddit
“You can’t connect the dots looking forward; you can only connect them looking backwards. So you have to trust that the dots will somehow connect in your future. You have to trust in something-your gut, destiny, life, karma, whatever. This approach has never let me down, and it has made all the difference in my life.” - Steve Jobs
Purpose
I recently published my first application on the iOS App Store and would like to use this post as a good opportunity to-
- Provide insight into the entire process from my perspective for anyone considering iOS App development (i.e. a post that I would share with my past self)
- Describe my workflow (decision making process, tools used, etc.) so that it is open to meaningful discussion and criticism
- Document my experiences for future reference
Some of the content in this post might be self-evident and at times downright trivial. This is a very intentional decision as I tried to make it as accessible as possible.
Background
I’m an electrical engineer (and finance major) with minimal practical software development experience. Prior to the start of this project, I had a reasonable grasp of fundamental programming principles (variables, conditional statements, loops), but everything else was learnt during the project. I’ve briefly worked as a Site Reliability Engineer, resulting in basic competency with sysadmin tools (command line interface, version control).
Motivation
I’ve been a part of the Apple ecosystem for a while and I’ve always been fascinated by the platform and the community around it. The idea of having my own App on the App Store motivated me for several reasons-
- It provided me an opportunity to contribute to an ecosystem that I have been a long time consumer of
- There was an inevitable prospect of solving technical and design challenges with practical utility (I was especially looking forward to dealing with user interface/user experience problems as this is something that I’ve not previously been involved with)
- While not really a priority, it is difficult and naive to ignore the potential monetary compensation resulting from an App that people find useful
Learning the Ropes
Before identifying what problem my App would solve, I chose to go through the foundations needed (grammar of the medium so to speak) to help me frame the problems that I might face before even being able to solve them. A perusal of Swift Documentation along with Apple’s App Development with Swift provided me a good overview of the language and Object Oriented Programming. Playgrounds in Xcode was a very intuitive tool to explore theses concepts.
I made a decision at the stage to utilise SwiftUI in an uncompromising manner. Despite the several issues present in adopting this approach, the declarative syntax of SwiftUI resonated with my mental model of UI construction (as opposed to UIKit). The unified implementation across all iOS devices and the tight feedback loop provided by Xcode previews were additional drivers behind this decision. Apple’s own walkthrough of SwiftUI was insightful, but there were still several gaps in my understanding of Swift and declarative programming to fully grasp the finer details.
After gaining a reasonable understanding of Swift and SwitUI, I moved on to some self contained projects that incorporated physical devices. This also allowed me to observe how people solved problems on the platform and was some of the most fun I had during the process as I was able to explore different frameworks without much of a commitment. In addition, it helped broaden the scope of problems that I was willing to solve (while walking thought some pretty cool projects). Here are some of the resources used-
- Hacking with Swift- not much I can say about this that hasn’t already been said. A really comprehensive resource for everything from small snippets to large projects
- raywenderlich.com- another fantastic resource, with a lot of well rounded projects
- AppCoda- a lot of useful tutorials (I found their walkthrough of In-App Purchases especially invaluable)
- The SwiftUI Lab- for some really awesome, fun and practical SwiftUI tutorials
- Swift by Sundell, SwiftLee and Simple Swift Guide
- SchwiftyUI and Azamsharp for some video walkthroughs
- Bret Victor- perhaps a bit tangential, but Bret has some truely insightful and eye-opening essays on design and problem solving
- WWDC Presentations
Tools used-
- Notion- for storing all content (apart from Xcode projects). I felt that Notion’s features (ability to set custom views for databases, page links and cloud sync) along with its general layout was a good candidate for this job. I used it to schedule tasks, create generic Kanban boards, store frequently used code snippets and save visual elements of finished projects (for later review/reference) along with all the resources used.
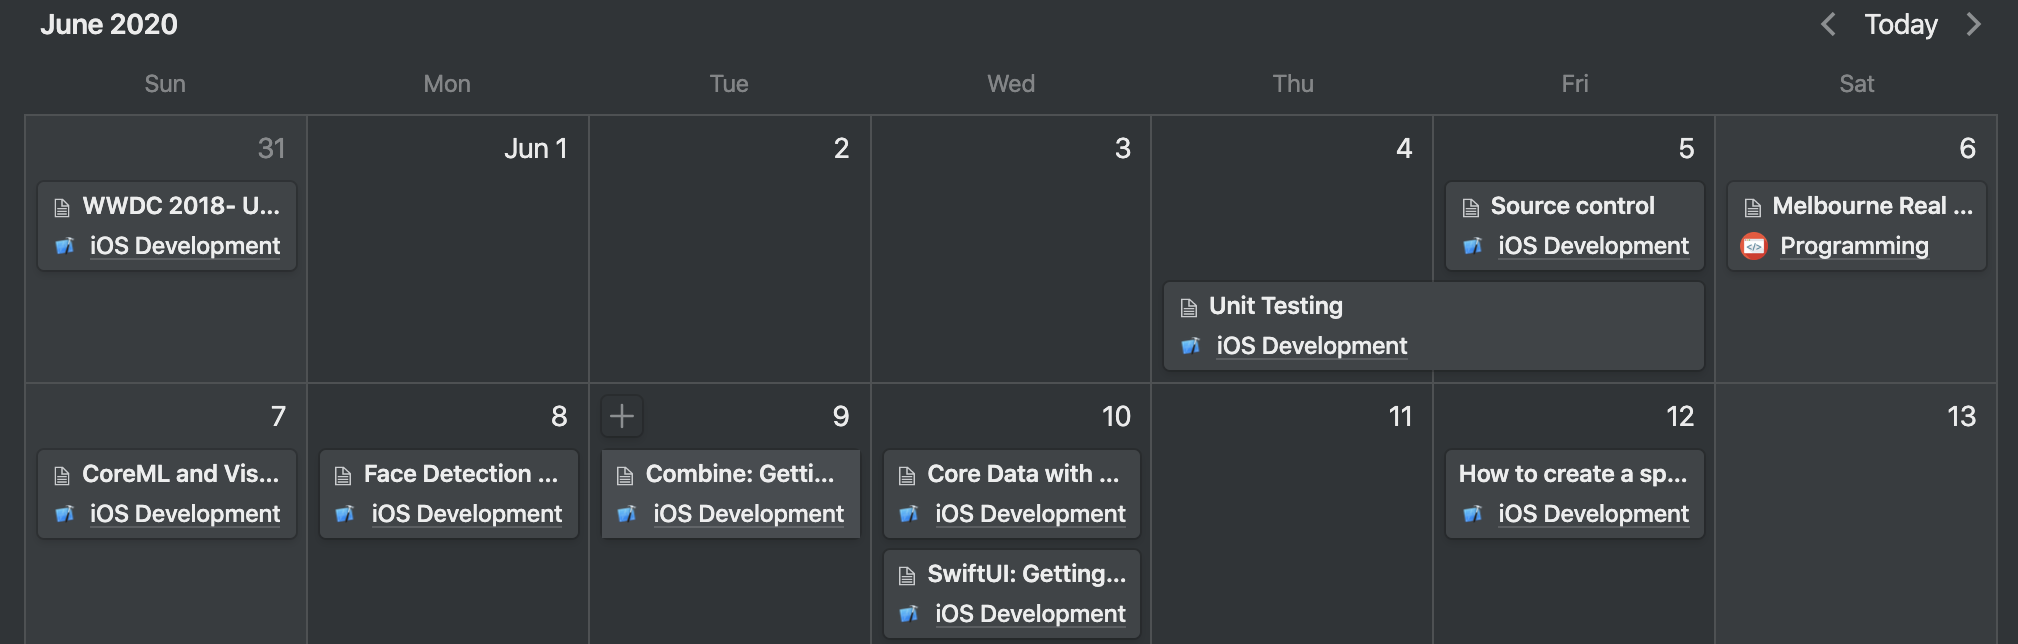
Figure 1: Notion- scheduling
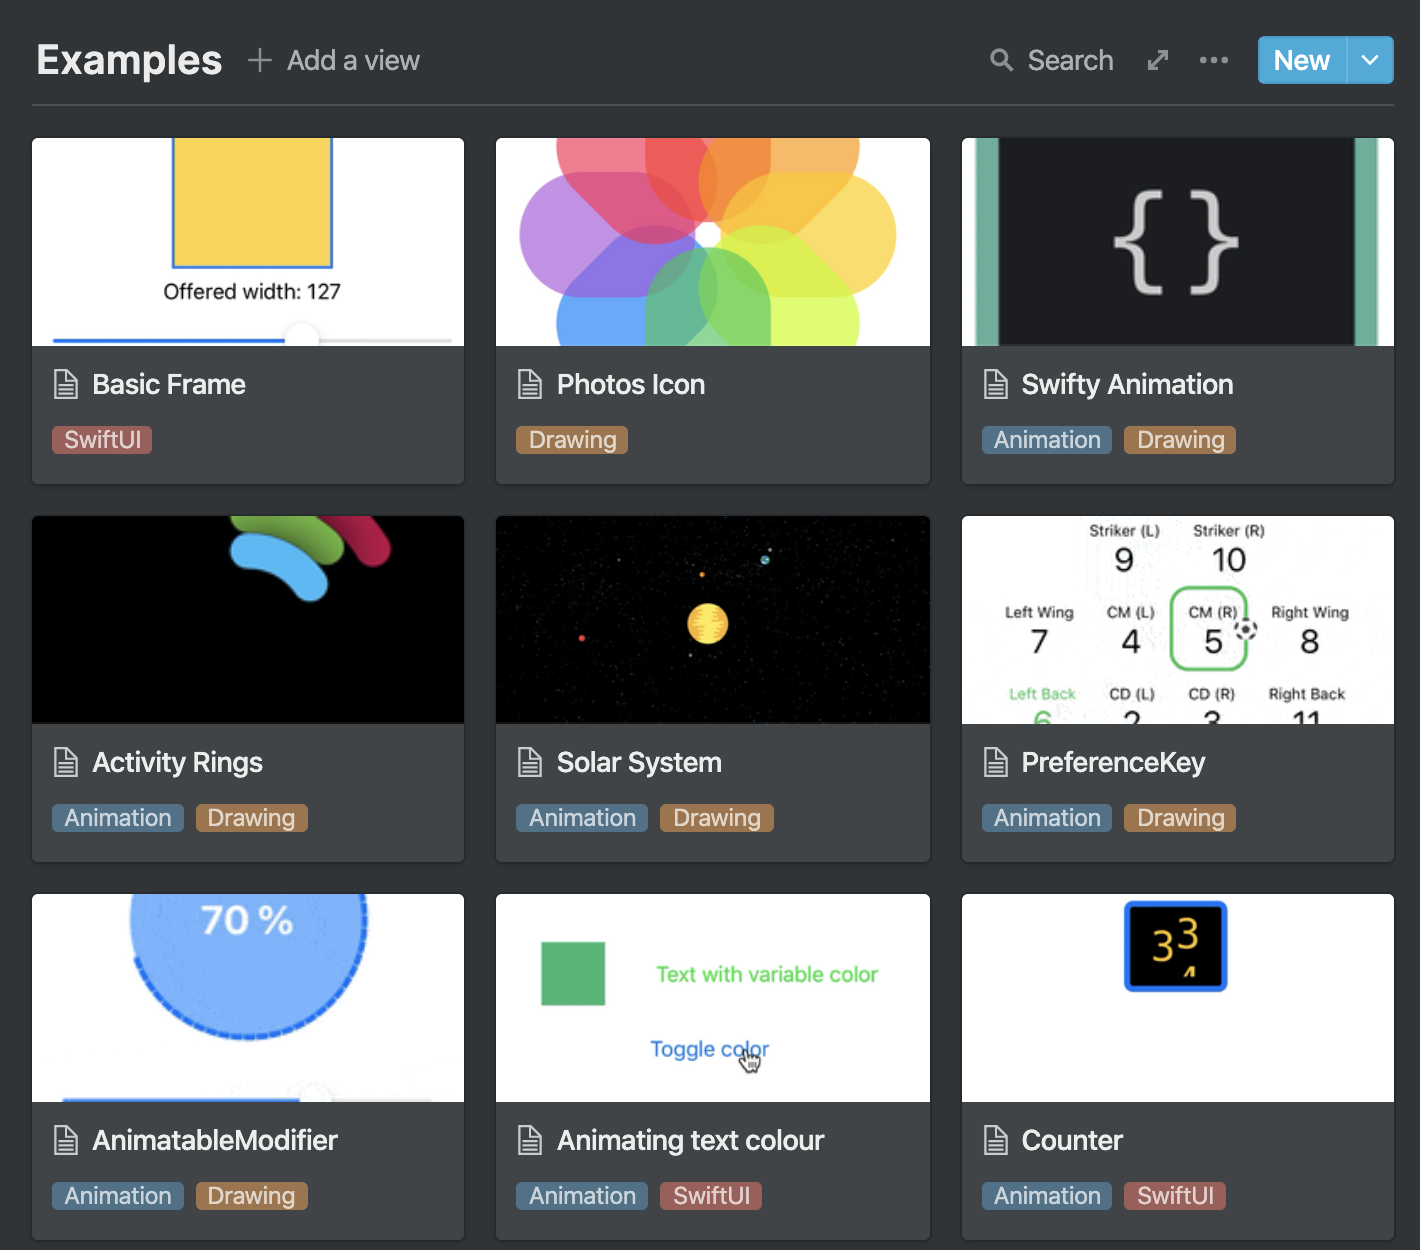
Figure 2: Notion- visual elements of finished projects
Visual elements of finished projects
Value Proposition
So what problem was my App going to solve? I did not dedicate a specific time for this activity, but engaged with it passively whenever it approached me subconsciously. A few considerations that affected my decision-
- Tempering my imagination by being aware of my present skillset
- Taking on a problem that is not trivial- by challenging me to my limits whilst still being achievable
- Be a problem that I faced in my daily usage
- Ensure the problem had a target audience > 1 (i.e. not something done for my own entertainment)
It’s evident from the above that there are a few conflicts between my considerations, which required prioritising one over the other (eg. I placed a higher weight on problems that I faced at the expense of reducing the target audience as I anticipated that the motivation derived from solving a personal problem would be a valuable asset during moments of stagnation during the development process).
Some of you might note that I did not include a time constraint and a financial budget above, which, I would imagine would be a reasonably high priority in any project. For a lot of personal reasons, these two considerations did not affect my decision (within reason of course, eg. a project longer than 6 months would be unfeasible in this instance), which might limit the usefulness of this post. However, I believe these two elements would just be added considerations that would require prioritisation as above.
Investigating Competition
I decided to address the problem of visualising personal data on a map, an idea that a lot of Apps solved as an afterthought (eg. Apple Maps and Google Maps with saved locations, Day One and Apple Photos with geographic data attached to individual entries) but very few did so intentionally. Investigating how existing Apps solved the problem helped me gain a concrete understanding of why someone (with the narrow use case as defined by the project) should download my App as opposed to those that I’ve mentioned. Investigating the competition also had the added benefit of bringing my awareness to the numerous UI elements available along with the deployment of these elements by other developers to achieve a specific task.
Project Workflow
I choose to divide the project into major functions (eg. search bar, data persistence, map interaction, etc.) that I would prototype and then implement individually and finally integrate at the end. Individual Xcode projects were created for each of these functions. Whilst this is a piecemeal approach, I found that I was better able to concentrate on the problem at hand and also keeping the scope focused. In order to mitigate an incompatible mess, I tried to define the functions to be as independent to each other as possible. I completely acknowledge that this is not the most efficient approach and presume that this would not be feasible for a lot of projects. I’d welcome a discussion for a workflow that would keep segments of a project independent and focused while also maintaining a holistic view.
Prototyping
Without any real experience with UI design (and a heavy reliance on intuition), I found drawing out UI elements and creating trivial storyboards to be really helpful as-
- they reduced the mental load of trying to place various UI elements in my head
- they helped me visualise transitions
- they reduced the potential for bias by providing a concrete visualisation as opposed to an abstract mental modal
- they were more lightweight than coding mock elements (this view might me contentions view and obviously dependant on the individual skill/preference)
My mockups usually involved trivial drawings of UI elements accompanied by text that rationalise decisions-
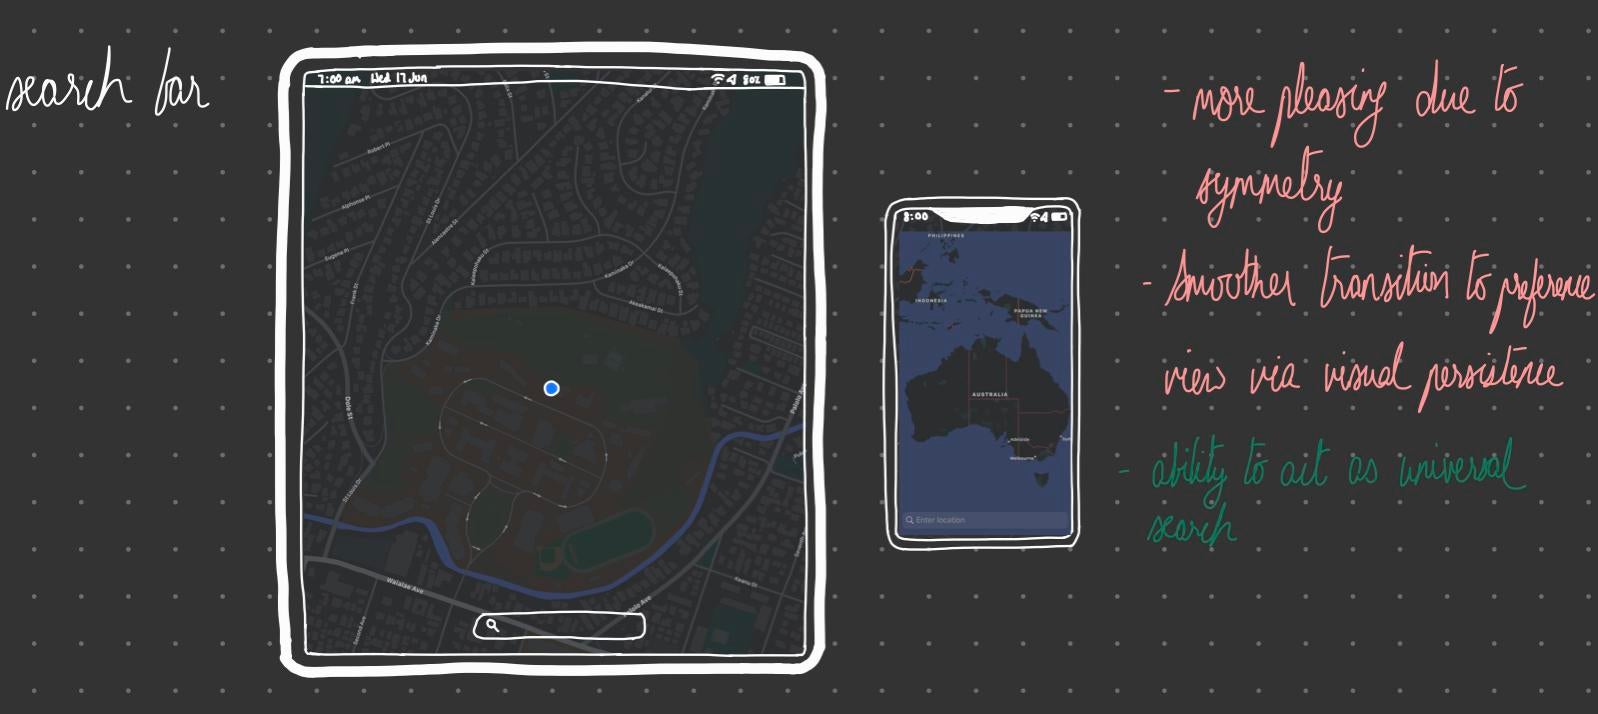
Figure 3: GoodNotes- prototyping
Tools used-
Technical Implementation
A satisfactory prototype usually led to identifying how it can be implemented on device. This stage usually involved identifying relevant pre-existing frameworks (usually first party) and then implementing the functionality using the APIs within the framework.
The specifics of this phase varied heavily with regards to the exact function that needed to be implemented, but what remained constant was the process of breaking down the problem as much as possible. Eventually, most broken down problems lead to a stack overflow post of someone who already had the same question. And yes, I was cognisant of making a genuine attempt to look up official documentations before resorting to stack overflow.
Occasionally, I would need to abandon a particular implementation for one of several reasons. For instance, implementing a translucent modal with custom gestures required significantly more engineering effort than anticipated and did not justify the value derived from the visual effect. Inability to use SwiftUI for specific tasks was another reason for reverting to the prototype stage. Resolving such a scenario usually involved simplifying the design (eg. using an opaque modal) whist still maintaining the functionality.
This stage had that highest level of frustrations but also happened to be the most rewarding. On several occasions, I would hit what seemed like a dead end only to return later to find a solution. Seeing the pieces fall into place was exhilarating and having a problem that personally motivated me definitely helped my willingness to expend the mental energy to resolve an issue.
For some problems, the process of solving the issue itself was rewarding and was extremely enjoyable. For other problems, it was more a matter of reaching the destination (i.e. means to an end), in which case leveraging code that other developers provided was very helpful (eg. code to encapsulated a SwiftUI view within a MapKit callout significantly reduced development time as my priorities were leaning more towards implementing how a callout should look, as opposed to making the SwiftUI elements compatible with MapKit). The source of frustration that I mentioned earlier arose when the problem was a means to an end and did not have an existing solution from other developers that I could leverage, requiring significant engineering effort which at times might have been misguided. I know this paragraph was a bit abstract, but I thought it was important to identify the source of enjoyment and frustration during the process.
Tools used-
- Omnigraffle- to assist in diagramming elements of a framework that I was having difficulty internalising (visualising key concepts and their relationships went a long way in helping me understand and use them)
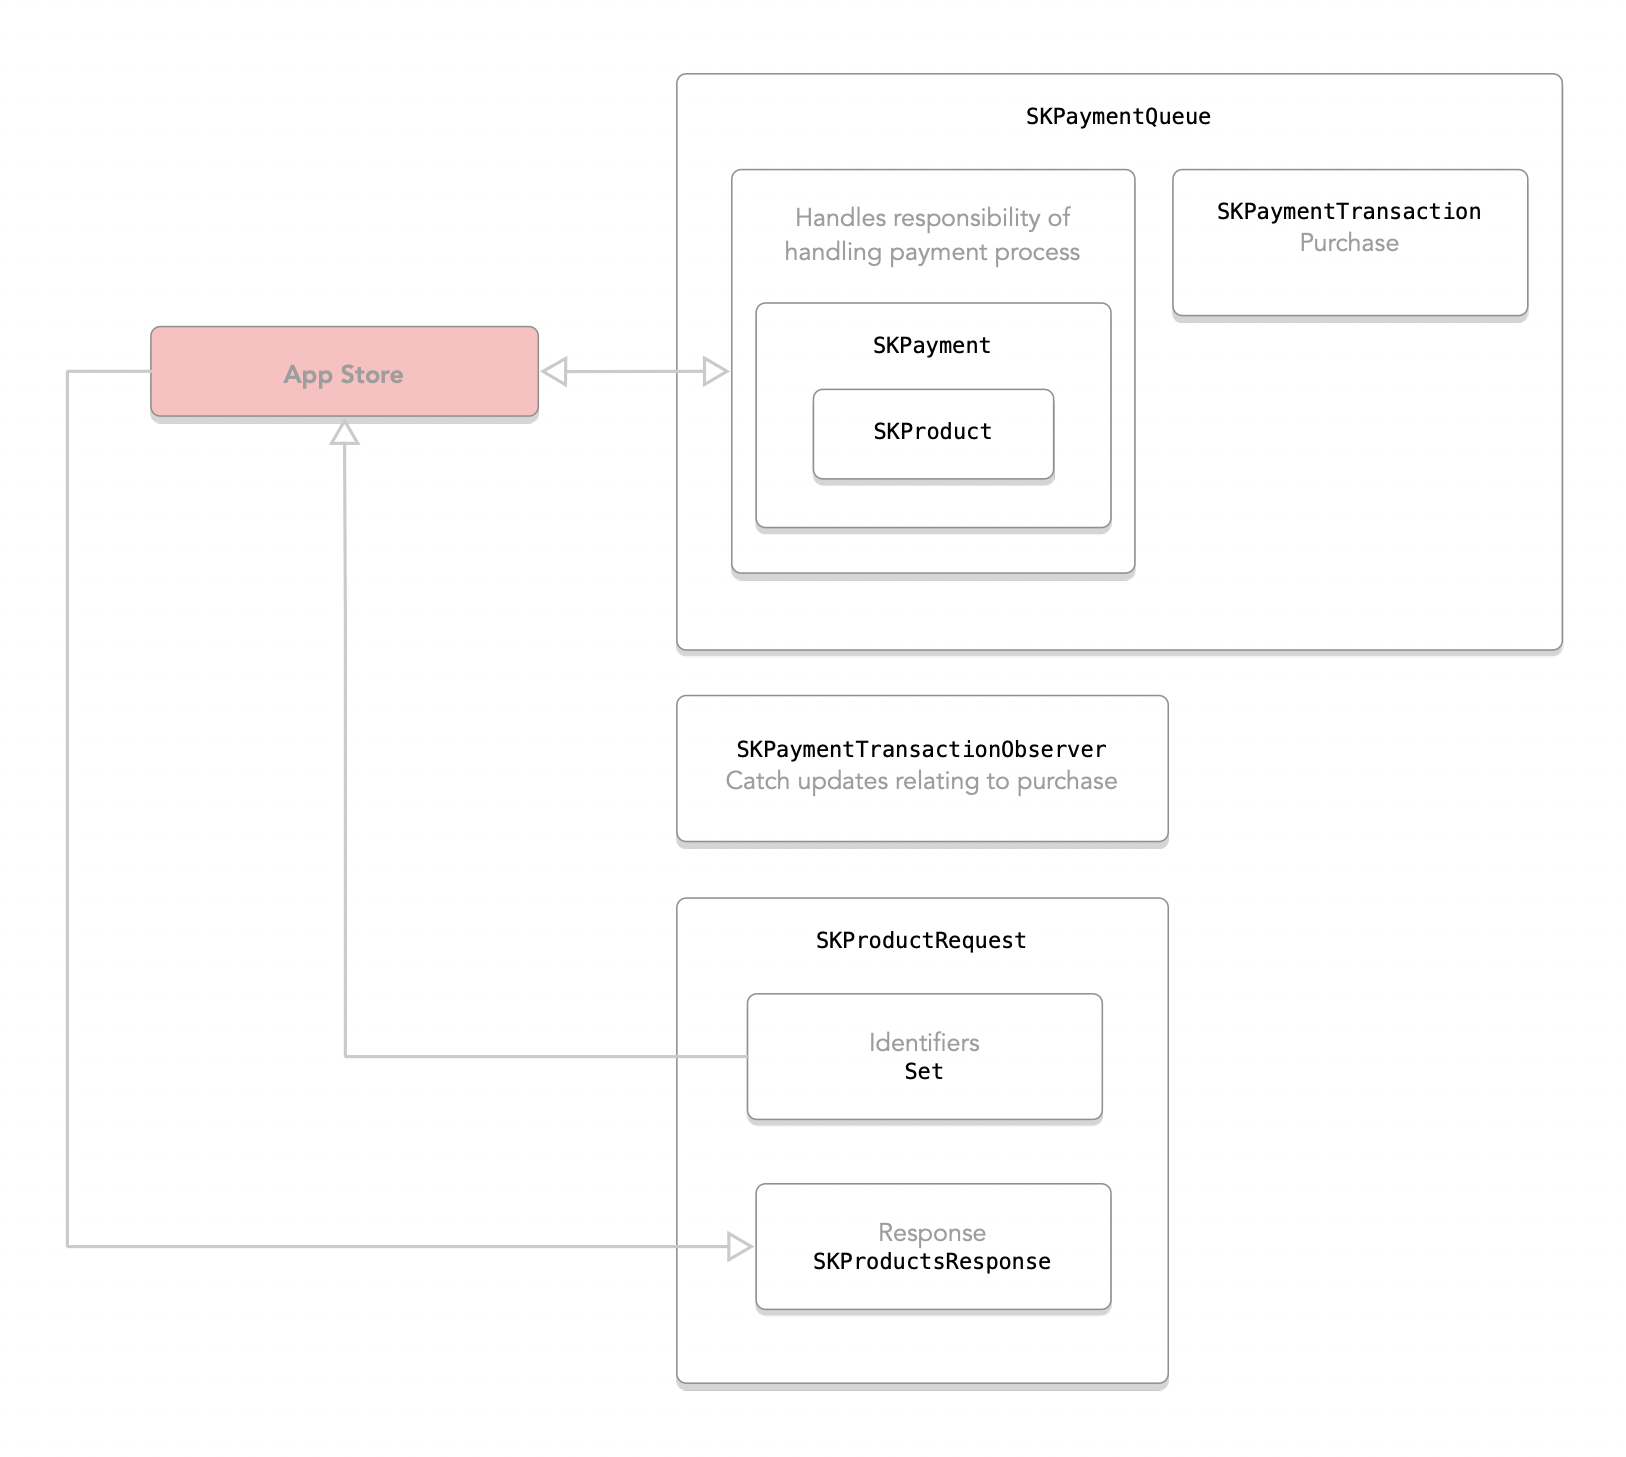
Figure 4: Omnigraffle- flow diagrams
- Monodraw- for when I needed to document logic as a comment within the code (for those interested- the below logic is adopted from an AppCode tutorial)
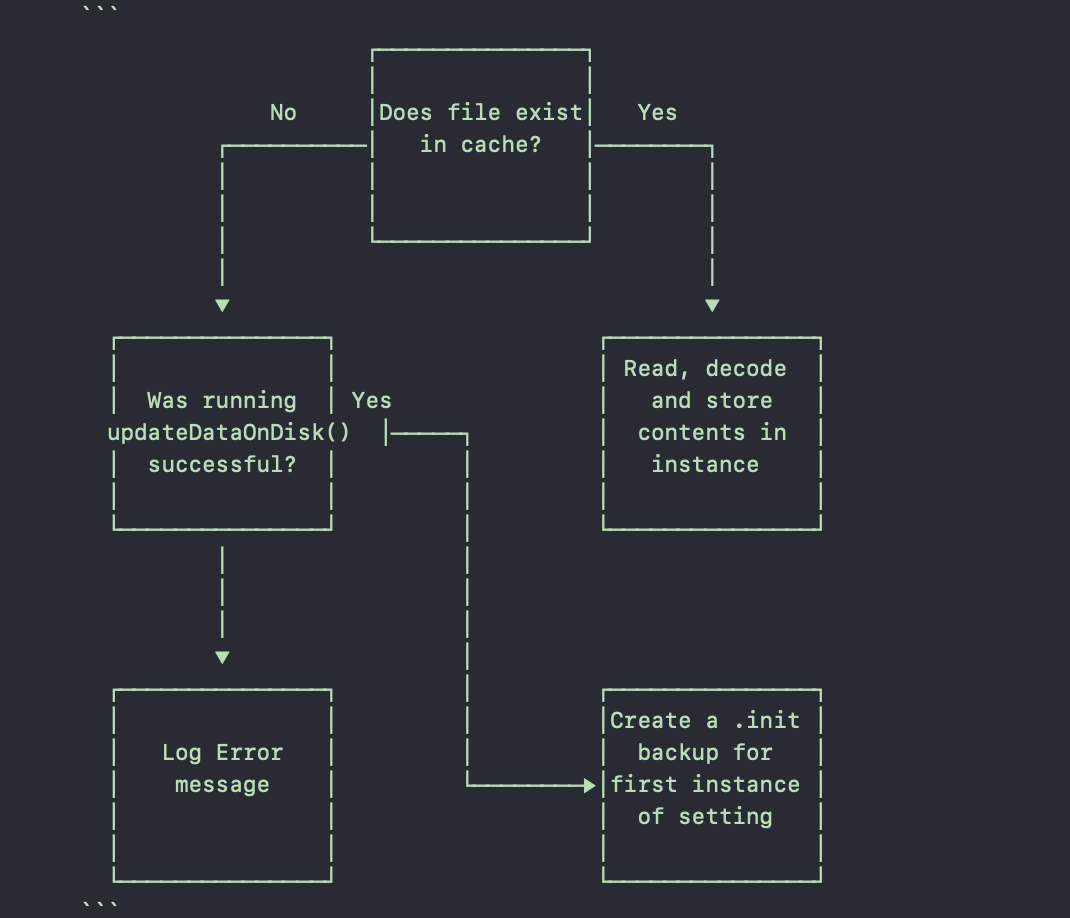
Figure 5: Monodraw- code comments as logic diagrams
Bringing it all together
Until it was time to bring all the pieces together, I did not really employ any form of version control. I’d imagine this would be frowned upon, but projects so far were small enough and focused for this not to be too much of an issue (however, there were occasions when it was an issue) and worth the overhead (I understand that the process of adopting version control might be so ingrained in standard software development that it might not even be considered an overhead, but personally keeping track of checkpoints was still an overhead- I’d imagine this is a sign of a more serious systemic issue with my approach).
Xcode’s standard git integration was leveraged and multiple branches were used for each of the major functions of the App (eg. map interface, menus, data persistence). However, I avoided concurrently working on multiple branches due to constant merge conflicts with the .pbxproj file (I was able to overcome the merge conflicts that I experienced with the help of this article). I’d be curious to hear how others handle merge conflicts with this file (especially teams with multiple developers). Hence, the benefits of using multiple branches was not capitalised and using them did not make a practical difference to the project. However, the project “felt” more organised, but I’m unable to quantify or articulate how.
I’ve always enjoyed working visually, for which reason I could not get myself to use git in command line despite being capable (I acknowledge that there are several git flags to customise the output and make it more visual, but I’m just not driven to utilise what’s fundamentally a text base interface unless absolutely necessary). Whilst Xcode provides a reasonable visual feedback for git commits, it’s still restricted to individual branches. I found GitKraken to provide a commit history that works with my mental model of a commit chain (I’d like to emphasise that is a completely subjective view as personally, the foremost reason for using GitKraken was that it was visually pleasing).
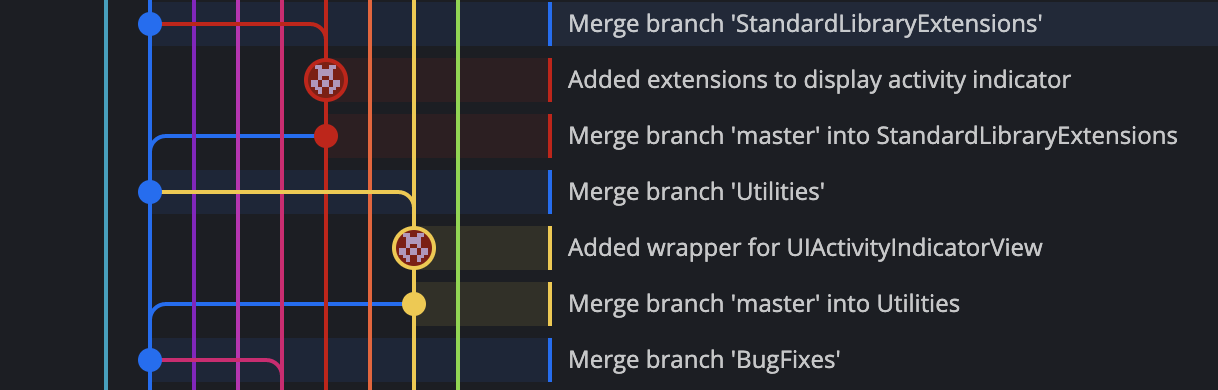
Figure 6: GitKraken- GUI for Git
Bringing all the elements together proved to take longer than I had anticipated. And while integrating each of the disparate pieces was definitely a source of this delay, it wasn’t the main culprit. What I did not anticipate was the amount work done up until this point and the effort required to port them into a fresh project. This is a trade-off that I acknowledged at the start, but miscalculated the cost for. Despite this, I’m uncertain how I would approach this issue differently for any potential future projects and would appreciate any input. Despite the minor delay, the App was starting to resemble a release candidate with the finish line is sight.
Admin
The App was now more or less a representation of what I envisioned it to be; so it’s only a push of a button away from making it to the App Store right? Well, there is still the matter of creating a developer account, registering a business, soliciting tester feedback, creating an App icon, settling on a suitable name, creating a developer website and preparing the App for the App review process. In honesty, the following tasks were not as mentally draining as I anticipated them to be, primarily because the finish line was now in sight.
Registering for a developer account was the first piece of real administrative task within the project. The reason I did not complete this until now was that for this project specifically, there was no real need for it until the it had to be distributed via TestFlight (this is not exactly true as you need a developer account for CloudKit integration and perhaps other frameworks as well, but this was a trivial task) for beta testing (which I’ll discuss below). Thanks to this very handy tutorial, the process was fairly straightforward (with the added benefit of setting up development/distribution certificates that will come in handy down the track). I also needed to register a business for taxation purposes in my country, which was reasonably seamless as the entire process was digital (your mileage may vary based on your local requirements).
App Icon and Name
Focusing on a purely design problem was a breath of fresh air after all that time spent in Xcode. The approach I adopted was to lay out my requirements for the icon and address them individually-
- the icon should represent the App (this requirement was so trivial, abstract and unmeasurable that I contemplated not including it here. However, it did help me set a general direction and acted as a check if I was straying too wide)
- the icon should be as simplistic as possible with regards to both the colours used and shapes deployed (this was more a result of reducing complexity due to my limited skillset)
I started reviewing my competitors and analysed what the chose to display on their icon and tried to rationalise their decisions. I then listed a set of concepts (eg. a representation of a map, indication of a bookmark, etc.) that I wanted to display and went about creating trivial sketches. An interesting observation here is that I now had several ideas of what my app should look like, but most of these subconsciously turned out to be a derivative representation of some of the apps that I analysed (resulting in a struggle to generate something that looked original). Iteration was the key here (something I’ll discuss in more detail further down). Whilst I did not solicit feedback for my icon design, this is something that definitely should have been done given my limited design experience.
My criteria for the App name was to select something that broadly defined the app while also not being already used by another app. My initial approach was to brainstorm several names, and select one that fits both the above criteria to the highest degree. However, some brief research on App names led me to the concept of App Store Optimisation. Whilst I did not completely switch directions with my approach to choosing my App name, the above article provided some handy guidelines that I tried to adopt (eg. suitable length for App names, maximisation of keyword utility, etc.).
Tools used-
- Procreate- for preliminary free hand concept sketches
- Vectornator- for the final vector image
- Icon Set Creator- to automatically generate App icons of different dimensions as stipulated by Apple’s guidelines
Testing
It’s time to address the elephant in the room. Several readers would have noticed that I did not mention testing throughout the post. This is because I just did not prioritise it in the project. Despite reading the several benefits of implementing testing as an integral part of the development process, I failed to dedicate time to writing tests for my code (apart from some trivial unit tests as part of my learning). In addition, the further I progressed through the project, the more I was disincentivized to spend time on writing tests as-
- I had that task of going through an ever increasing number of test cases
- I was taking time away from engineering effort that would get me closer to the release (despite being fully aware that a project containing tests with good code coverage would likely mean reduced overall development time as a result of identifying bugs earlier and ensuring future changes do not break critical features)
The combination of the above factors resulted in procrastination, which created negative cues whenever I considered writing tests. I will admit without any dispute that this aspect of the project fell short (my a big margin) of what would be considered good development practice. However, I personally felt it was a lack of incentives that drove me in this direction. I knew that I had to write tests in tandem with new functions added to the project, but falling behind even by a little margin resulted in a feedback loop that disincentivized me from writing tests. I was fortunate to not encounter any major setbacks as a result of lack of testing, but I would definitely not like to rely on chance for future projects. I welcome any feedback/suggestions/strategies (perhaps creating a script to prevent Xcode from compiling if it detects code coverage of tests to be less than a specified percentage?) on this aspect of the project.
I did however distribute my App via TestFlight for beta testing. Another fantastic tutorial from raywenderlich.com made this process fairly streamlined. I derived a lot of value from this process in terms of adding polish to my App and also receiving feedback from individuals who were able to highlight aspects of the App that I was blind to. A few iterations of this distribution and feedback loop allowed to me to reach a stage where I was satisfied with the state of the App while acknowledging the compromises made.
Developer Website
I was surprised to find out that all Apps required a privacy policy along with a developer website and a contact email. Fortunately for me, I already had a domain registered that I could utilise. Generating a privacy policy however, was a bit more involved, not only in terms of the content that was required, but also the format. I came across this post and followed the advice of using the privacy policy from Overcast as a guide to structure my policy (as a side note, I’ve been a long time ATP listener). I also developed a product/market page, which required a non-trivial amount of effort, but helped me streamline my message for the App. All this is to say that this aspect caught me off guard and ensured that I would be cognisant of this requirement and make sure to allocate the appropriate budget (time and money) to this task in the future.
Resources used-
- Hoverfor domain name registration (this choice was based on supporting a few of the podcasts that I listen to)
- Squarespacefor web hosting, developing my product page and privacy policy and to create an email address for my custom domain (rationale for choosing this is the same as above; there are several alternatives here that could better suit your needs)
Release
Submitting the App for App Store review was again fairly streamlined with the help of a previously mentioned walkthrough. This more or less involved filling in a lot of information (name, keywords, description, etc.) that was already prepared. Supplying screenshots for the required devices took a surprisingly long time and I would like to hear about any tools that simplified this process.
Apple is known to reject a sizeable proportion of first time submissions as a result of failing to adhere to its review guiltiness, and I really did not know what to expect from this process after submitting my App. I received a response within a day and my app did in fact get rejected. However, this was due to a failure to provide a demo video, which was easily remedied. After resubmitting my App, I was able to find it on the App Store the next day.
Valuable Lessons
Time Tracking
I was introduced to the concept of time tracking by CGP Grey a while back, but only realised it’s impact once I fully adopted it into my workflow. I can not overstate the impact that it had on my project, which was evident in analysing my output before and after adopting time tracking. Apart from creating a record for time spent on the project (which would regularly be used for financial purposes such as billing and cost analysis), time tracking more importantly-
- ensured intentionality- when a timer was set for development, I knew I purposefully chose to dedicate time for this task and nothing else. On the same token, when I set the timer for a break, I was fully able to recharge by preventing myself from thinking about development and enjoy my time off.
- reduced distractions- I was mentally driven not to get side tracked while the timer was tracking serious development time. This was surprising as it did not even require a lot of will power that might otherwise be needed to stay focused and not get distracted.
- provided me with a more objective reflection of my effort- while I might approximate my effort to equal a day’s worth of work, the data might state that I only spent 2 hours of development. This ensured I couldn’t subconsciously trick myself into believing that I spent my time efficiently and added much-needed discipline to my workflow.
Tools used-
Iteration
Despite planning ahead and constantly reviewing progress, the project at times felt like a constant uphill battle. While this challenge itself acted as a motivation, confronting situations when the output did not meet my expectations was disheartening. As a concrete example, in my mind’s eye, I visualised an aesthetically pleasing icon and went about implementing it. However, when I completed my first draft, the result was underwhelming to say the least-
Figure 7: App Icon- early iteration
However, recognising that this was a preliminary draft, identifying the foundations that could be built upon (eg. the general shape and layout) and determining improvements (eg. use of shadows and highlights to create depth) that would allow me to get closer to what I envisioned was vital in methodically recreating the design with a focus on improvement. Spending time away performing other tasks also allowed me to approach the next iteration with a mentally refreshed attitude. With a few more of these iterations, I was able to get closer to what I wanted the icon to look like-
Figure 8: App Icon- final iteration
This is to say that most elements of the project are a work in progress and require constant iteration for improvement. Acknowledging this helped to focus on avenues of improvement as opposed to seeing the App as it currently exists.
Bigger Picture
There were several key decision made throughout the development process that had far-reaching effects. Being cognisant of these decisions was vital to the long term feasibility of the App. I specifically want to mention this because I found that if I wasn’t attuned to these decisions, the repercussions only become apparent in hindsight.
To give another concrete example, at a certain stage in my project, I needed to determine a method to store user data. At this stage of the App, the type of data was trivial and UserDefaults was a straightforward mechanism to store the data. CoreData was the alternative for my particular use case, but required significantly more effort (> 1 week) as I had no experience in it. I chose CoreData more so because I was interested in it, accepting the delay in implementation. This proved to be a fruitful decision as my data model evolved to become significantly more complex, contained relationships and required CloudKit integration, all of which CoreData facilitated with minimal effort once it was setup. I was fortunate here as if my interest in CoreData waned, I might have chosen to use UserDefaults to reduce the development time, which would have caused major obstacles in the future.
However, “being aware of unforeseeable consequences of a decision” is not really an actionable or measurable approach. For my future projects, I would list all but the non-trivial decision (this would be pre-defined) and explicitly rationalise each decision and their impact on a pre-defined set of future scenarios. If available, I would also request a more experienced developer to review certain decisions.
Final Notes
The idea of having my own App on the App Store was on my mind for a long time and I am pleased to finally set aside the time to work towards executing this idea and seeing it through to it’s completion. Like most challenges, there were a range of emotions involved and the lessons learnt were applicable even outside software development (eg. recognising the importance of time tracking). My App still requires a lot of polish, but I like to think of it as a work in progress. For those interested, its called Journal Mapper and you can find our more about it here and download it on the App Store.
![]()